Masthead header

It all started with a trip to Goodwill.  Sitting on the shelf were a set of 2 vintage gold bow curtain holders. I placed them in my cart and for some reason I told myself I really didn’t need them. I went home not really thinking about them until that night when I went to bed. As I laid in bed trying to fall asleep I began thinking about those bow hooks and how they would make the perfect towel hooks in the bathroom.

I have been wanting to paint our egg blue walls in the bathroom white for awhile, but just haven’t had the time.  As I tried to fall asleep I told myself if the bow hooks are still there in the morning it is meant to be; to start redecorating/painting the bathroom.

I was the fist one at Goodwill that next day, and sure enough the gold bow hooks were still where I last seen them.

Being raised by a single mom, house projects were done D.I.Y style and usually on a very small budget.  No matter how big or small, we tried it. My mom was never afraid to try something new, or run to the hardware store to buy a new tool to get the project done.   Her determination rubbed off on me.

bathroom5

This past fall my friend Ashley and her dad taught me how to tile.  A day I will never forget.  After we finished her kitchen backsplash I couldn’t wait to get home to find a blank wall of my own.

Our bathroom is the last room in our house to really need some TLC.  Our very old and outdated linoleum and faux marble countertop was really starting to drive me crazy. Now that I had the tile bug in me I was confident I could try tackle the project.

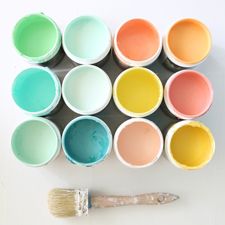
To get things started I first painted all the walls white. The fresh white made my heart skip a beat. It was so freash and clean. Next, I painted our cupboards a pretty mint / aqua color using behr Marquee : Mirador ( M420-3) .

Once all the painting was done the tile shopping began.  Being on a tight budget I started looking at the typical brick and mortal hardware stores. Not really finding what I wanted I ventured to a specialized tile shop.  And there it was, a white and black floral hexagon pattern. It was exactly what I was looking for.  My heart sank when I saw the price. Way over my budget.

I had my heart set on that tile but left empty handed.

As soon as I got home I began to do some research online to see if I could find the same tile at a lower price. Within minutes, I found it $3.00 a sq. ft CHEAPER on Wayfair.

After ordering my tile online, it came right to my doorstep a week later all packaged in bubble wrap.  It can’t get any better then that.

While I was waiting for my tile to be delivered, I got brave and painted our bathroom countertop. It was previously an ugly cream faux marble.

bathroom1

This my friends is miracle paint.

I have painted my fridge and stove and even some tile with this paint. All were also a ugly cream and just needed a little face lift. I was amazed by it’s results.

The difference in this paint vs. regular paint is it’s epoxy hard enamel base.

After I had my counter clean and wiped down I started with the first coat using a foam roller. Once I had the first coat done, I made sure to let it dry over night and then added another layer of paint. Don’t rush this process as you really want to make sure the paint dries inbetween each coat.  Each project is different, but expect to add 3- 5 coats possibly more depending on your surface.

After the painting process was complete, I let everything settle for another day.

Over all it has been holding up really well . The hard enamel creates a really durable surface.  For $10.00 I have a new counter top.

bathroom4

The Wayfair tile arrived this week and I am hoping to get it in stalled this weekend. I couldn’t wait to open the boxes to take a peek. Everything on the Wayfair website described the tile perfectly.
I had to open a box and lay the tile out to get a sneak peek of what it will look like once it’s installed.

bathroom6

I can’t wait to share with you phase two hopefully next week on how I installed the tile and the steps you need to take if you are wanting to start your own bathroom makeover.


  • March 10, 2016 - 6:22 am

    Amy Coose - I love the new tile, and yay for finding a deal! The cabinet color is beautiful, I can’t wait to see it all come together.ReplyCancel

  • March 10, 2016 - 9:35 am

    laurie magpie ethel - Im very impressed with your DIY skill and fun to see this bathroom through the process. It is looking pretty darn great so far…can’t wait for the end result. (I also lie in bed and night and mentally decorate)ReplyCancel

  • March 25, 2016 - 8:47 pm

    Jessica - Do you have to sand anything before using the epoxy paint?ReplyCancel

  • April 5, 2016 - 6:02 am

    How to tile your bathroom floor / phase two » Be Crafty - […] I mentioned in phase one, the main bathroom is the last room in the house to really need a makeover. I would have laughed at […]ReplyCancel

  • June 22, 2016 - 6:01 am

    Bathroom Remodel Reveal » Be Crafty - […] you missed the in progress posts you can see part one here, and part […]ReplyCancel

If you follow me over on Instagram you know I have a deep love for thrifting and finding vintage chairs.  Last  year I started a hashtag of my dog Emma sitting on  the chairs that I find. I love looking through at all the photos and wanted to document them in a mini album that was functional to always be adding more photos to.

Using Maggie Holmes BLOOM collection, I kept this album really simple.

I cut down my 12×12 double sided paper to 8.5×6 and then folded it in half.

hashtagminialbulm

On the inside I created a folder using this fun and bright pattern paper also from the BLOOM collection.  To create the folder I cut my paper to size and then pre-sewed around the edges and then used double sided adhesive to attach to my inside flap.

On the opposite page I used a small glassine envelope to hold more photos.

hashtagmini2

The photos on the left are lightly larger and are printed horizontal.

hashtagmini3

To keep the photos together in the glassine envelope I used a gold paper clip and tied a ribbon bow to the top.

hashtagmini33

hashtagmini6

I hope this inspires you to pull some of you photos off social media and add them to your collection of memory keeping.

The snow is finally starting to melt here in Minnesota, and I am getting so excited for spring. I’ve been doing lots of cleaning and De-cluttering trying to freshen things up.

Our fridge always seems to collect random papers and coupons leaving it looking messy and cluttered. I took 15 minutes to remove all the paper , this inspired me to make some new magnets to help make the fridge look a little more attractive.

flowermagnets

Using my board stickers from Maggie Holmes  bloom collection I started off by gathering my supplies. I suggest using the extra strong magnets. They tend to do a better job of holding .

magnetsblog

Once you have gathered all your supplies peel your flowers off and stick them onto a plain white piece of paper.  You will need to cut the extra white paper around the flowers.

flowermagnets1

Once you have cut the paper from around your flowers hot glue your magnets to the back side.

flowermagnets2

The hot glue should dry in seconds and our magnets are ready to be put up on your fridge.

magnetsfridge

A fun and quick project that can be done in less then 30 minutes, and it leaves your fridge looking pretty.

flowermagnetscoseup

Happy Valentine’s Day sweet friends.

I hope you are spending you day with loved ones and stuffing your face with lots of chocolate and candy hearts.

I wanted to do something special this year for Valentine’s Day. I teamed up with 2 of my favorites North Star Balloons and Pretty Girl Designs to share the love with a little random acts of kindness around my town.

heartballoons

I filled 14 red heart foiled balloons, stuffed them in my trunk and drove around town.

One of my first stops was at was this cute pink brick house .

I quickly jumped out of my car and tied the balloon to their front door.  I wish I could see the faces when everyone finds their balloons .

heartballoondoor

On each balloon I tied a YOU ARE LOVED tag created by Darcy of Pretty Girl Designs . She is sharing the FREE  PDF  with you so you can go out and spread the love too.

I printed the tags off on cardstock paper , punched a hole on the top and attached one to each balloon.

randomactsofkindesstags

Going out and doing Random Acts of Kindess is one of my favorite things to do. Holiday or not.

heartbaloons2

Wising you all a VERY happy Valentine’s Day.

And Remember, YOU ARE LOVED.

xo.


I love Valentines Day.

A full  day smothered in Pink and Red . And better yet, it’s a day to let your family and friends know how much you love them.

A few weeks ago while I was at the thrift store I came across a vintage egg basket and immediately thought of a friend. I added it to my cart and brought it home with me.  The basket has been sitting in my grage just waiting to get packaged up .


VALENTINESDIY

Round item’s can be tricky to wrap, so I decided not to wrap the whole basket.  Using a strip of crepe paper I used my sewing machine and ruffled it together. Once I had it wrapped  around the basket I glued the two crepe paper ends together and then tied a piece of lace and gold sequins to the top.

I then began layering and adding a variety of textures to the top.

  1. Vintage flash card ( 2+3 = 5 is the number of people in the recipients family - 2 adults / 3 kids )
  2. Vintage Valentine
  3. hot pink ribbon tied onto a gold paper clip
  4. cloths pin with glittered top
  5. pink tickets
  6. Maggie Holmes SHINE collection “LOVE YOU” paper
  7. White shipping tag typed with a message and added accessories from Maggie Holmes BLOOM collection

GIFTWRAPPOST

To start I first placed the vintage flash card on top of the ruffled crepe paper and under the lace.  The tickets then went on top of the flash card. .

giftwrap3

This vintage valentine goes perfect with the chicken wire basket gift. I have been saving it for the perfect gift and am so excited to finally share it.

valentinescard

On top of the tickets I added the vintage Valentine card and used my bow paper clip to hold everything together.

giftwrapDIY5

Lastly, I tucked in my typed note and added the ” LOVE YOU” card to the top.

Don’t be afraid to layer and use a variety of textures.

finalpackage

Valentines Day is all about letting those close to you know who much they are loved. I’m hoping this little package will put a smile on a friends face.

M o r e   i n f o