Late in October The White House Girls and I opened a pop-up Holiday vintage store. It has been such a fun adventure. Documenting photos with our friends and family is important but it’s also important to remember the things we do and create. I never want to forget the late hours in the night I’ve stayed up painting furniture and my favorite color pallets.
Today, I am guest posting over on Maggie Holme’s blog sharing how I document during the business of life and the holiday season.
We got our first snow fall . The ground is officially covered in snow and it’s feeling a little more like Christmas.
This past summer at one of the Estate Sales I attended I picked up a old rusty bucket. I think the lady at the checkout thought I was crazy for buying a old metal bucket. I knew right away I wanted to use it this Christmas to decorate.
I was provided product by Behr paint to write this post but the thoughts and opinions expressed are my own.
With a little paint my old bucket was new again. Using Behr paint, I painted the entire bucket inside and out.
I add some dirt inside along with a small Christmas tree for decoration. The bucket sits perfectly on my painted chair which I now have placed on my deck next to our front door.
I think every Christmas needs a little red + pink. For the bucket I used poinsetta and painted the chair Mixed Fruit.
What better way to enjoy the snow then with a cup of Hot Cocoa.
I’ve teamed up with Behr Paint and the rest of the DIY Expert blogger for a Holiday Home Challenge. Hop on over to see lots of inspiring projects for your outdoor Holiday décor along with a GIVEAWAY for 4 gallons of paint to 3 lucky winners. ENTER GIVEAWAY >>>> a Rafflecopter giveaway
It’s slowly beginning to look like Christmas around the house. Last year I bought a white Christmas tree and when I pulled it out over the weekend it was all yellow. A couple cans of white spray paint and 24 hours to dry it was back to normal.
While I waited for the big tree, I gathered some supplies to make gold glittered tree’s for our mantel.
I was provided product by BEHR to write this post but the thoughts and opinions expressed are my own.
SUPPLIES
Gold Glitter tree sticks ( Walmart under $4)
Small wood blocks
Wood glue
Drill
Behr Paint
Once you have all your supplies, start pulling the tree’s off the sticks. The paper comes off fairly easy. Grab one of your wood blocks and start drilling a hole in the center. Your drill bit should be the same size as the metal tree stick ( ie: not big).
TIP >>>> do NOT drill all the way through the block.
Once you have your holes drilled, fill them with wood glue and stick your tree inside. Set aside till fully dried. About 10-20 minutes.
Now comes the fun part, PAINT!!!! I am using white paint .. you can pick any color you want. I always buy Behr Premium Plus Ultra.
Using a small paint brush, I painted the entire wood block. Be careful you don’t get any paint on the tree. You can always use a little washi tape around the bottom to prevent any paint getting on the stem.
With the Ultra paint I only needed one coat ( high five) .
Every year I decorate the fireplace with little tree’s . Last year they were all shades of pink. This year it’s green and gold.
I like tradition + change.
While the tree’s were in the drying process my mom and I made new stockings. I love mixing new and vintage together.
If I don’t get to any other decorating, at least the tree’s are up !!!!
I can’t believe it has already been a couple weeks since our last BE CRAFTY workshop. This workshop was a little different then our typical workshops. I had the honor of hosting with my dear friend Ashley and her sweet daughter in Oklahoma. Together we welcomed 50 young girls and their mothers for a Mother + Daughter BE CRAFTY. The day was as sweet as can be. Seeing all the young girls with their mothers spending a couple hours together, crafting and just being was truly special.
The event took place at The Workshop Tulsa ( a co- creative workshop space ). We filled the rooms with pretty decorations and balloons from Shop Sweet Lulu. We set out supplies on the tables that were lined with white table cloths. Ashley and I painted black polka dots on the sides. Balloons and a chalk board sign that was created by Lesley Zellers welcomed the girls as they entered.
The day was full of smiles and lots of excited little voices. We split the workshop up into two sessions due to the high interest; A morning and a afternoon group.
As the girls walked in they all received a name tag. At the end of the workshop we used the ticket numbers for a couple fun giveaways from our sponsors.
Our treat table was decorated with lots of pretty honeycomb balls, tissue fringe, tickets and fabric strips. As a little girl I can’t image walking into a room filled with such pretty. I could hardly contain the excitement myself.
Cake stands were filled with the amazing Livi Lee’s Donuts. I think the girls by passed the lemonade and water when their eyes saw all the different kinds of donuts.
We spent the afternoon creating 4 projects. Each Mother + Daughter got to create their own project. We encouraged the mothers to let their daughters be as creative as they wanted.
They each got to make a cute storage jar + beaded necklace/key chain + headband and notebook.
We were so blessed to have so many helpers . Carol, Ashley’s mother spent the day helping all the girls /mothers on the sewing machines.
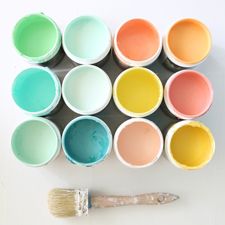
Behr paint sent us a variety of their paint sample containers to use for our wood bead and jar projects.
At the end of the workshop we handed everyone a swag bag that was filled so many amazing items from our sponsors.
A BIG thanks to our amazing photographer Jessie and all the behind the scenes helpers. These workshops are so fun, but could not be done without you. And thanks to all the Mother + Daughters. I had such a fun day crafting with you, I can’t wait to come back and do it again !!!!
>>> For more event photos hop on over to Ashley’s blog >>>>>
Today I am gust posting over on Maggie Holmes blog . I recently made a few of these super cute and easy notebooks for a gift. I originally made them for a little girl, but now I want to make some for myself. If you are a list maker like myself, these notebooks are just what you need.

.jpg)
.jpg)

.jpg)
.jpg)
.jpg)
Celina Amezcua - Love this! What size gold album are you using? 6 x 8?
[email protected] - Yes !!!!